

Borrow the storytelling structure, not another brand’s assets
Amazon A+ style is used here as a descriptive reference to a familiar format: product benefits, visual evidence, useful comparisons and answers to buying questions arranged in clear modules. This is an independent Shopify workflow, not Amazon’s A+ publishing service, an integration or an endorsed program.
The title’s zero-JavaScript and no-monthly-fee promise is limited to avoiding an additional page-builder runtime and an ongoing OCTOshopX software subscription after the license is paid. It does not remove existing storefront scripts, Shopify fees, model costs or every other service charge.
For merchants searching for Amazon A+ content on Shopify, the useful goal is a better product explanation. Build your own layout, copy and imagery. Do not copy another seller’s photographs, logos, comparison artwork, reviews or distinctive branded design.
Step 1: choose one product and collect the facts
Pick a product you understand well. Save its current description and images, then gather the facts a customer needs: materials, dimensions, use cases, compatibility, care, limitations and what comes in the box. Keep shipping and warranty statements consistent with your actual policies.
Choose one main buying question. A technical product may need a compatibility explanation; an apparel item may need fit and fabric detail. The right visual page answers that question rather than adding decorative sections because a reference page has them.
If you use a reference screenshot, use one you own or have permission to use. Ask for a fresh interpretation of broad section order and spacing. Keep your own brand identity and verified product facts.
- Save a restorable original before editing.
- Mark missing specifications for review instead of generating plausible numbers.
- Use only testimonials and certifications you can substantiate.
Step 2: plan five useful modules before adding more
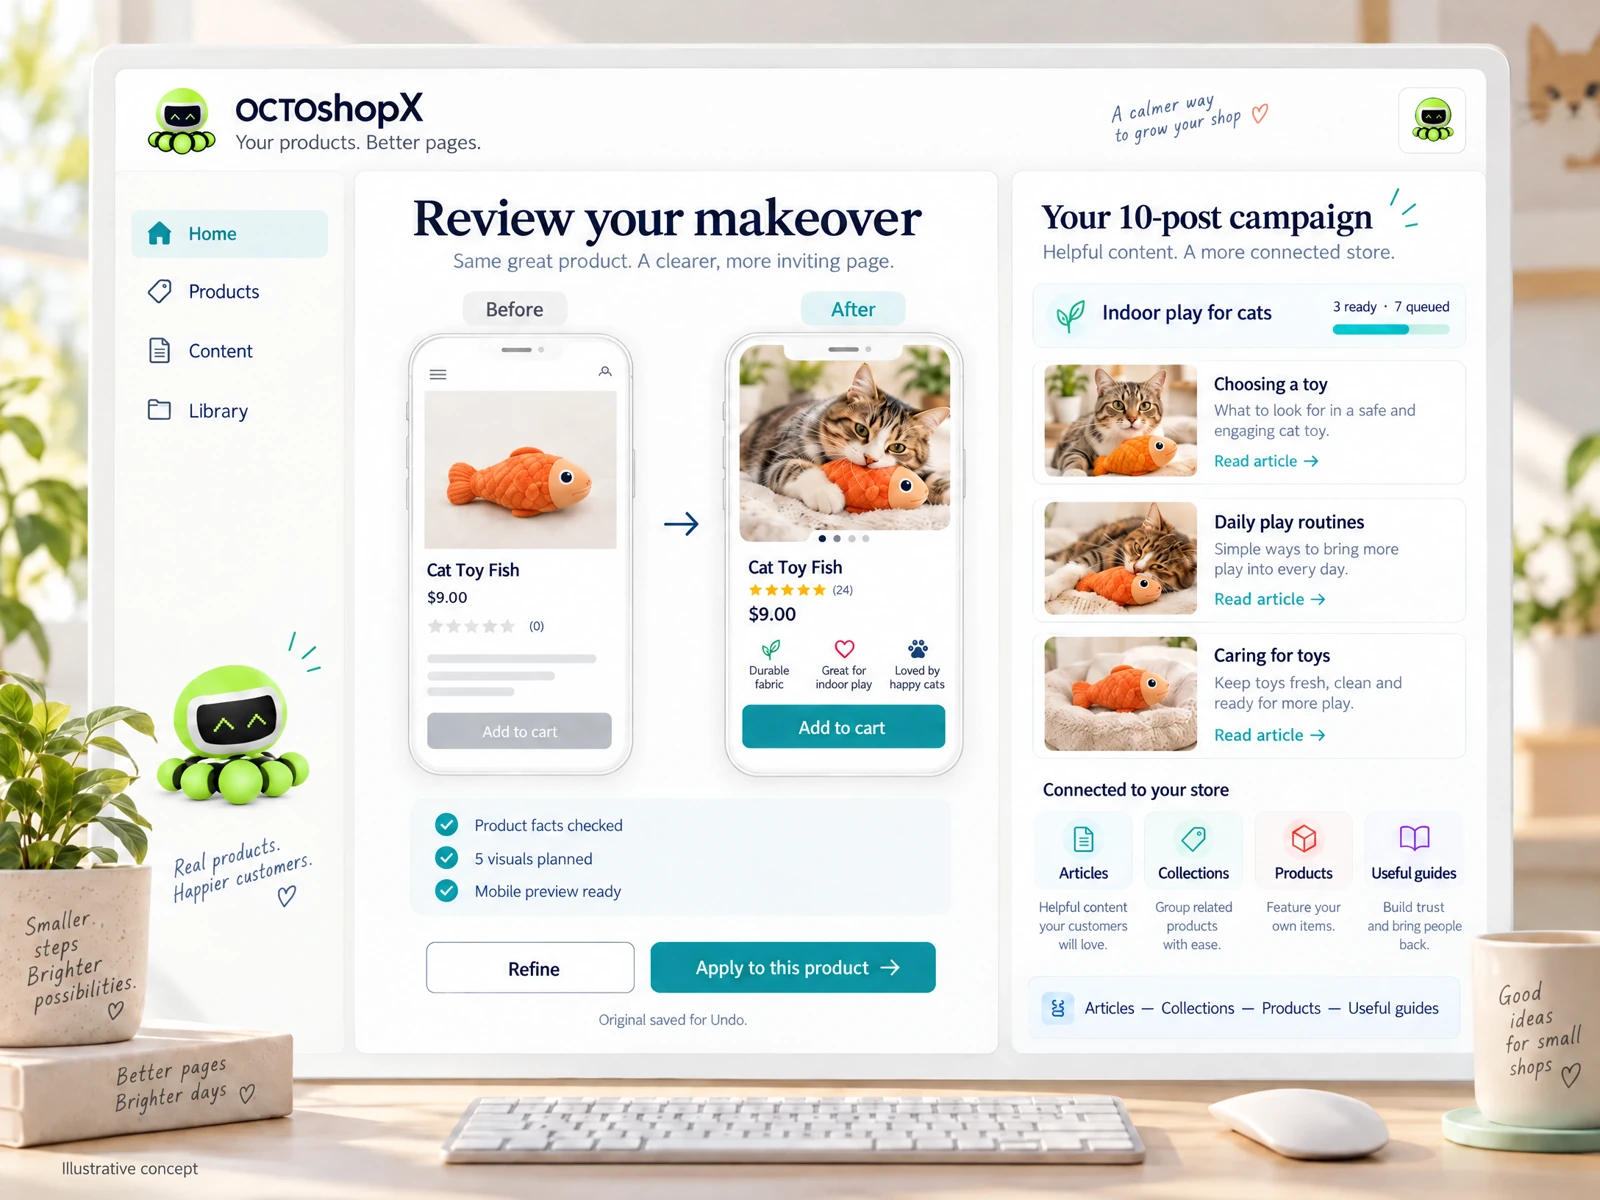
Begin with a concise promise that accurately describes the product, followed by a visual showing it in context. Then explain the main benefits, demonstrate the details that support those benefits and answer the common objection. Finish with useful care or fit information and a clear next step.
Five sections can be enough. Expand toward ten only when each additional module answers a distinct question. Keep the essential explanation as selectable text so it remains readable, accessible and adaptable to different screen sizes.
Leave pricing, variants and purchase controls with the supported Shopify theme workflow. A product-content makeover is not a reason to replace a working purchase form with a picture of a button.
- Hero: what the product is and who it is for.
- Benefits: connect a verified feature to a real use case.
- Evidence: original close-ups, dimensions or a supported demonstration.
- How to use or choose: reduce uncertainty before purchase.
- FAQ and next step: answer an objection without inventing a claim.
Step 3: build a useful image budget
Aim for five to ten appropriately sized WebP images, with a working target below 100,000 bytes per asset where visual quality allows. That is an asset target, not a total-page promise. Ten images near that limit can approach one megabyte before fonts, styling and other resources.
Resize for the display size and inspect the result on a phone. Avoid compressing away small product details that matter to the purchase. Supply meaningful alternative text for informative images, and do not put essential specifications only inside a picture.
Load lower-page imagery when needed, while ensuring the main visible image is not unnecessarily delayed. Use measured results to judge the tradeoff between detail and weight. A small file that misrepresents the product is not an improvement.
Step 4: create the first preview in a non-coder workspace
On eligible Antigravity accounts, Knowledge Work focuses the interface on the conversation and outputs. Describe the page you want in ordinary language and ask for a preview before any store update. The simpler interface does not change the importance of checking the target and reviewing the result.
Try this brief: “Use my approved product facts to draft five visual sections. Keep the important text readable, preserve the existing buying controls and flag missing evidence. Use my own images and brand style. Show the mobile preview and what will change before publishing.”
Treat three minutes as a first-preview challenge after the input files and connection are ready. Record the actual elapsed time. Review and publication are separate stages, and there is no benefit in rushing a wrong specification onto a live product.
Step 5: check the output rather than trusting the label
A static native-content approach can avoid adding an external page-builder runtime. That does not mean the whole Shopify page has no scripts. Your theme, reviews, analytics and other apps may still execute code, and the page still needs styling and image resources.
Compare the same product before and after under consistent mobile conditions. Record image weight, script and styling transfers, layout stability and the point at which the main content becomes useful. Repeat the run instead of selecting one unusually favorable score.
This is the practical meaning of a Shopify product page makeover without app bloat: do not add a dependency the content does not need, and verify the result. It is not a measured accusation about every competing builder or a guarantee that your score will improve.
Step 6: publish a reviewed change and retain a way back
Before publishing, read every claim, test the links and review the page at narrow and wide widths. Check headings, contrast, image clarity and the path from product options to purchase. Confirm that the exact selected product is the one you intend to update.
Save the original and review the change. After applying it, open the actual storefront page and verify the content and purchase controls. A queued operation or a successful preview is not confirmation that the live page is correct.
Only then consider extending the format to another product. Carry forward the approved design rules, but do not reuse product-specific specifications or proof where they do not belong.
- No horizontal scrolling caused by oversized content.
- No broken image or product links.
- No duplicate main heading introduced by the new content.
- No invented scarcity, reviews or performance claims.
- An original version is available for a reviewed restore.
The cost decision: content production versus an ongoing editor
The OCTOshopX offer supplied for this workflow is $399.90 once or four payments of $99.98 ($399.92 total), followed by $0 per month software subscription. Separate Shopify and applicable AI or other services remain your responsibility.
An ongoing page-builder subscription can still be worthwhile if you need its editing tools, team features or repeated campaign changes. If your goal is a clear product story saved in the existing store, compare that simpler scope first. Purchase on demonstrated fit, not an assumed conversion lift.
The implementation principles are useful with other tools too. Begin with truthful content, use original visuals, limit unnecessary dependencies and retain a review-and-restore path.
References and further reading
Shopify’s theme performance guidance: https://shopify.dev/docs/storefronts/themes/best-practices/performance . Antigravity interface documentation: https://antigravity.google/docs/settings .
Amazon’s own description of A+ Content: https://sell.amazon.com/tools/a-content . This article does not grant access to Amazon’s program or permission to reuse another seller’s content.
Compare the native-content workflow with the named builders at https://octoplux.com/compare/shopify-page-builders-vs-octoshopx . OCTOplux sells OCTOshopX; Amazon, Shopify and other third-party names are used only to identify the referenced services and are not endorsements.
Can I use Amazon A+ Content directly inside Shopify?
This guide describes an independently created modular product story on Shopify. It does not transfer or integrate Amazon’s A+ publishing service. Create original text and visuals and use the supported content tools for your store.
Do I need ten images for every product?
No. Use only the modules that help a customer understand that product. Five useful sections may be better than ten repetitive ones. The under-100KB goal is per image, subject to clarity, not a whole-page guarantee.
Will the page contain zero JavaScript?
The intended content workflow adds no external page-builder runtime. Existing theme and app scripts can remain. Verify the actual output and resources before making a zero-added-runtime claim about a specific page.
Can I copy a competitor’s A+ layout?
Use permitted references to understand broad storytelling principles, then create your own expression. Do not reproduce protected assets, copy, logos or distinctive branded designs without permission.
Can the free trial improve my entire catalog?
The OCTOshopX-Free offer described in this campaign is a one-SKU trial. Evaluate the supported result on that product; additional production requires the appropriate entitlement. A free utility key is not automatically an OCTOshopX trial key.
Are monthly Shopify or AI fees included in the one-time license?
No. The software offer is distinct from Shopify and applicable model, usage or other third-party charges. Check the current license scope and service requirements before buying.
Install OCTOshopX. Give your store one clear job.
Start with one product and a question your current description does not answer well. Build a preview, inspect the mobile result and approve only a verified change. Visit https://octoplux.com/download for the current free activation options, or https://octoplux.com/compare/shopify-page-builders-vs-octoshopx to compare the workflow before choosing a license.
A calm Shopify Product & Blog Studio: 5–10 useful visuals, connected articles and products, preview before publishing, and 1-Click Undo when needed.
Keep exploring
- Compare: OCTOshopX vs. Shopify Page Builders (PageFly, GemPages, Replo, Shogun)
- PageFly vs. GemPages vs. Replo vs. OCTOshopX (2026): Why Store Owners Are Ditching Drag-and-Drop Subscriptions
- How to Connect AI to Shopify No Code: A 2026 Practical Guide for Merchants
- Best AI Agent for Shopify Store Management